Friday, August 14, 2015

How to root Lenovo K3 Note (k50-t5/k50-a40)


REQUIREMENTS:


1.  Super SU zip : Click Here to Download (Check the files section on fb group)
2.  Custom Recovery(CWM/TWRP) installed on your K3 Note : Click Here to learn how to flash custom recovery to Lenovo K3 Note.
3. Lenovo K3 Note (Obviously)

PROCEDURE TO ROOT LENOVO K3 NOTE:


1.  After flashing custom recovery using SP Flash Tool by following this guide.

2. Power On Lenovo K3 Note and copy the downloaded Super SU zip file (Note: Do not extract the zip file) in your memory card.

2. Power Off your phone.

3. Press Volume Up + Volume Down + Power Button at the same time to boot into custom recovery (TWRP/CWM).

4. Once in custom recovery, select "Install".

5. Then choose your Super SU zip file from the location in your memory card you copied earlier.

6. Swipe to right to flash the SuperSU zip file.  This will root your Lenovo K3 Note by installing SU binaries and SuperSU superuser app.

7. Then select Reboot System.

8. You should find a new app called SuperSU in your app drawer. Run it once and update the SU binaries if it asks you.

9. Download any Root Checker app from Play Store and check if your phone is successfully rooted or not.

10. Njoy! You have successfully rooted your Lenovo K3 Note.

FB GROUP : LENOVO K3 NOTE OFFICIAL GROUP [INDIA]

https://www.facebook.com/groups/Lenovo.K3.Note.Official.Group.India/
Read more »

How to Flash Custom Recovery to Lenovo K3 Note (k50-t5/k50-a40)

PRE-REQUISITES:


1. First ensure the battery of your phone is above 75%, so then it will never get switched OFF during the middle of the process.

2. Next install the drivers for your phone using Lenovo K3 Note drivers.

Disclaimer : Follow the given below procedure at your own risk. I would not be held responsible for any damage that occurs to your phone, in case you do not follow the procedure properly.

REQUIREMENTS:


1.  TWRP Recovery : Click Here to Download (Check the files section on fb group)
2.  Lenovo K3 Note Drivers : Click Here to Download (Check the files section on fb group)
3. SP Flash Tool download link: Click Here to Download (Check the files section on fb group)
4. A Windows PC
5. A Lenovo K3 Note (obviously)

INSTALL DRIVER :


Install the driver then restart your PC, then connect your phone to PC via USB cable and wait till Windows configures it. Make sure the USB Debugging is enabled in this process. Once the configuration has completed, again restart your PC.

If you are using Windows 8 or Windows 8.1 then you may face problem to install the driver so follow these steps to install an unsigned driver.

For Windows 8:

1. Win + I -> Change the computer settings -> General -> Special boot options -> Restart Now.

2. When you turn off the tap Diagnostics -> Advanced Settings -> Boot Options -> Restart.

3. A menu appears, select it in the “Disable the mandatory driver signing checks” – for this you have to press F7.

For Windows 8.1:

1. Win + I -> Change the computer settings -> Update and Restore -> Restore -> Restart Now.

2. When you turn off the tap Diagnostics -> Advanced Settings -> Boot Options -> Restart.

3. A menu appears, select it in the “Disable the mandatory driver signing checks” – for this you have to press F7.

PROCEDURE TO INSTALL CUSTOM RECOVERY ON LENOVO K3 NOTE SMARTPHONE:


1. Next extract the Recovery zip file downloaded from above link.

2. Extract and open the SP Flash Tools and run "flash_tool.exe" as administrator.

3. In SP Flash Tools, just click the “scatter loading” it will ask you the location of the scatter loading file for your phone.

4. In the extracted folder of the Recovery, select the file “MT6752_Android_scatter.txt”(it is our scatter loading file) as shown in below image.


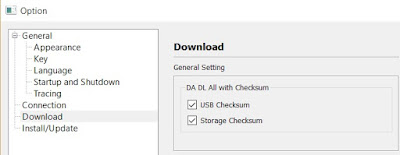
5. In the menu “Option” tab, go to “Download”, and put a “tick” in the “DA DL All with Checksum”.


6. Next Switch off your phone .

7. Make sure Download only option is selected in SP Flash Tool as shown in the image below. Now hit the Green Download button.


8. Connect your phone now to PC via USB. The Flash tool will start the flashing process, you can see the progress at the bottom of the flash tool.

9. Don’t disturb the process until it get finished, otherwise it will brick your phone.

10. Once the process is finished, a green check box  will appear in SP Flash Tool, which implies the installation of stock firmware on your device is successful.

11. Now, disconnect your phone from USB Cable and Press Volume Up + Volume Down + Power Key at the same time to boot into Custom Recovery Mode.

12. Njoy! You have successfully installed the Custom Recovery on Lenovo K3 Note.

FB GROUP : LENOVO K3 NOTE OFFICIAL GROUP [INDIA]

https://www.facebook.com/groups/Lenovo.K3.Note.Official.Group.India/
Read more »

Monday, August 10, 2015

How to Unbrick and flash Stock ROM on Lenovo K3 Note (k50-t5)

If you are familiar with the rooting process, you probably know that rooting and changing the ROM in android phone remove the manufacturer warranty. But if the phone already have official ROM the warranty will never void.

The official ROM for Lenovo K3 Note smartphone is now available. At below I have given the procedure to install the stock ROM on your phone. By installing this ROM you will back to official ROM.

PRE-REQUISITES:


1. First ensure the battery of your phone is above 75%, so then it will never get switched OFF during the middle of the process.

2. Next take full backup of your phone.

3. Also backup the important data like SMS messages, Whatsapp messages, Contacts etc., as this would be formatted during the process.

4. Next install the drivers for your phone using Lenovo K3 Note drivers.

Disclaimer : Follow the given below procedure at your own risk. I would not be held responsible for any damage that occurs to your phone, in case you do not follow the procedure properly.

REQUIREMENTS:


1.  Official stock ROM (K50a40_S112_150610_ROW.7z) Lollipop 5.0 Indian version : download link Click Here to Download
2.  Lenovo K3 Note Drivers : Click Here to Download (Check the files section on fb group)
3. SP Flash Tool download link: Click Here to Download (Check the files section on fb group)
4. A Windows PC
5. A Lenovo K3 Note (obviously)

Install Driver :


Install the driver then restart your PC, then connect your phone to PC via USB cable and wait till Windows configures it. Make sure the USB Debugging is enabled in this process. Once the configuration has completed, again restart your PC.

If you are using Windows 8 or Windows 8.1 then you may face problem to install the driver so follow these steps to install an unsigned driver.

For Windows 8:

1. Win + I -> Change the computer settings -> General -> Special boot options -> Restart Now.

2. When you turn off the tap Diagnostics -> Advanced Settings -> Boot Options -> Restart.

3. A menu appears, select it in the “Disable the mandatory driver signing checks” – for this you have to press F7.

For Windows 8.1:

1. Win + I -> Change the computer settings -> Update and Restore -> Restore -> Restart Now.

2. When you turn off the tap Diagnostics -> Advanced Settings -> Boot Options -> Restart.

3. A menu appears, select it in the “Disable the mandatory driver signing checks” – for this you have to press F7.

PROCEDURE TO INSTALL STOCK ROM ON LENOVO K3 NOTE SMARTPHONE:


1. Next extract the Stock Rom folder
 
2. Extract and open the SP Flash Tools and run "flash_tool.exe" as administrator.

3. In SP Flash Tools, just click the “scatter loading” it will ask you the location of the scatter loading file for your phone.

4. In the extracted folder of the stock ROM, go to the folder named “K50a40_S112_150610_ROW” and in there go to target_bin folder select the file “MT6752_Android_scatter.txt”(it is our scatter loading file).

5. In the menu “Option” tab, go to “Download”, and put a “tick” in the “DA DL All with Checksum”.


6. Next Switch off your phone .

7. Make sure Download only option is selected in SP Flash Tool as shown in the image below. Now hit the Green Download button.


8. Connect your phone now to PC via USB. The Flash tool will start the flashing process, you can see the progress at the bottom of the flash tool.

9. Don’t disturb the process until it get finished, otherwise it will brick your phone.

10. Once the process is finished, a green check box  will appear in SP Flash Tool, which implies the installation of stock firmware on your device is successful.

11. Now, disconnect your phone from USB Cable and Power On your phone.

12. Njoy! You have successfully installed the stock ROM or Official ROM on Lenovo K3 Note.

FB Group : Lenovo K3 Note Official Group [India]

https://www.facebook.com/groups/Lenovo.K3.Note.Official.Group.India/
Read more »