Thursday, March 5, 2015

List of KitKat Based Custom Roms for Karbonn Titanium Octane Plus

Read more »

List of Jelly Bean Based Custom Roms for Karbonn Titanium Octane Plus


Custom ROM MYUI G2.1H_4.5.23  (pan.baidu.com) (pass : q0wv)
Cusrom ROM Samsung  (www.needrom.com)
Custom ROM MultiLanguage  (www.needrom.com)
Custom ROM AOSP  (www.needrom.com)
Custom ROM Color OS  (bbs.coloros.com) (pilih yang paling baru berdasarkan tanggal build)
Custom ROM Vibe OS  (www.mediafire.com) (credit to Mishop Ivishop II (Grup FB Octa))
Custom ROM Vivo FunTouchOS  (pan.baidu.com) (pass : 1n4i)
Custom ROM Pure AOSP  (www.kaskus.co.id) (credit to himura05  (www.kaskus.co.id))
Custom ROM Amigo OS  (pan.baidu.com)
Custom ROM YUN OS  (pan.baidu.com) (Pass : 6q6h)
Custom ROM Mlais  (www.needrom.com)
Custom ROM Samsung N9002  (www.mediafire.com) (credit to Mishop Ivishop II)
Custom ROM Xperia  (www.mediafire.com) (credit to Mishop Ivishop II)
Custom ROM Touch UI Indo Mod  (www.4*shared.com) (credit to : Mart Ind Larocha)
Custom ROM Samsung Note 3  (pan.baidu.com) (pass : 62yo)
Custom ROM Cool OS  (pan.baidu.com)
Custom ROM Vivo FuntouchOS 1.20.0  (pan.baidu.com) (pass : u2z8)
Custom ROM Samsung S5  (pan.baidu.com) (pass : qgx0)
Custom ROM Baidu v5  (pan.baidu.com)
Custom ROM Samsung TouchwizuUI  (pan.baidu.com)
Custom ROM JB 4.2.2 AMOI  (drive.google.com)
Custom ROM GALAXY S5  (pan.baidu.com) (pass : lbs3)
Custom ROM CoolLife5.5  (pan.baidu.com) (dev : wangxiaoli520)
Custom ROM CoolLife5.5  (pan.baidu.com) (pass : pg2s) (dev : jjixdd)
Custom ROM Swordsman OS  (pan.baidu.com)
Custom ROM Baidu Beta 5.3  (pan.baidu.com) (pass : mrft)
Custom ROM MyUI G2.1H_4.7.17  (pan.baidu.com) (pass : l0xt)
Custom ROM FuntouchOS1.21.2  (pan.baidu.com) 

Tutorial for how to flash CWM recovery for Karbonn Titanium Octane Plus Click here

Read more »

Friday, December 19, 2014

Tutorial To Install Stock ROM On Karbonn Titanium Octane Plus


Install Stock ROM On Karbonn Titanium Octane Plus

If you are familiar with the rooting process, you probably know that rooting and changing the ROM in android phone remove the manufacturer warranty. But if the phone already have official ROM the warranty will never void.

The official ROM for Karbonn Titanium Octane Plus smartphone is now available. At below I have given the procedure to install the stock ROM on your phone. By installing this ROM you will back to official ROM.

Pre-requisites:


    First ensure the battery of your phone is above 75%, so then it will never get switched OFF during the middle of the process.

    Next take full backup of your phone.

    Also backup the important datas like SMS messages, Whatsapp messages, Contacts etc., as this would be formatted during the process.

    Next install the drivers for your phone using Karbonn Titanium Octane Plus drivers Click Here to Download

    Disclaimer : Follow the given below procedure at your own risk. I would not be held responsible for any damage that occurs to your phone, in case you do not follow the procedure properly.

Requirements:

1.  Official stock ROM (Karbonn_Titanium_Octane_Plus_978128_9404_KK_V031005) JB 4.4.2 :download link Click Here to Download
2.  Canvas HD Drivers : Click Here to Download
3. SP Flash Tool download link: Click Here to Download
4. A Windows PC
5. A Karbonn Titanium Octane Plus (obviously)


Procedure to install Stock ROM on Karbonn Titanium Octane Plus smartphone:


1. Next extract the Stock Rom folder

    Optional:

    If you want to install CWM along with official ROM, then replace recovery.img with CWM recovery (Download the updated version of CWM from this page and Learn how to install CWM in your Octane Plus on this page).

  
2. Extract and open the SP Flash Tools and run as administrator.

3. In SP Flash Tools, just click the “scatter loading” it will ask you the location of the scatter loading file for your phone.

4. In the extracted folder of the stock ROM, go to the folder named “www.moulnisky.com_978128_9404_kk_V009061” and select the file “MT6592_Android_scatter.txt”(it is our scatter loading file).

5. Next Switch off your phone (To make it sure just remove the battery).

6. In Flash tool, go to options and click USB mode so that it is enabled. Click options again and then go to DA, Download All>Speed and finally select High Speed.

7. Click the download option (present on the right of firmware upgrade option) and flash the tool will start looking for your phone.

8. Connect your phone now. The Flash tool will start the flashing process, you can see the progress at the bottom of the flash tool.

9. Don’t disturb the process until it get finished, otherwise it will brick your phone.

10. Once the process is finished, a green ring will appear on your phone, which implies the installation of stock firmware on your device is successful.

11. Now, disconnect your phone and enjoy.
Read more »

Thursday, December 18, 2014

How to install CWM and root your Karbonn Titanium Octane Plus

Follow these steps to root your phone.


Preparation of flash/update:


1. Take a backup of your phone.

2. Your phone battery should charge 80% minimum.

3. Read all steps then do it careful.

4. Make sure proper power backup of your PC.

Download:


1. MT6592 Scatter file(MT6592_Android_scatter.txt) Click here to download

2. SP-Tool(Flashtool.rar)  Click here to download and USB  Driver(Karbonn-Usb-Driver.rar) for Octane Plus Click here to download

3. CWM Recovery for Octane Plus(recovery.img) Click here to download


4. Root Kit -SuperSU(UPDATE.zip) Click here to download

How to Root and install CWM recovery on Karbonn Titanium Octane Plus KitKat:

Step 1: Install drivers in your PC and Enable USB Debugging on your Phone. Go to Settings >>> Developer options >>> USB debugging check it . After then switch off your phone.


Step 2:  Download SuperSU file and copy in your phone memory card. Now Download CWM recovery and scatter file of your phone and extract these file in a folder where you want. Extract and open the SP Tool. Sptool.exe Run as Administrator.

Step 3: You will see an SP tool window, now click on the scatter-Loading option in the SP tool. Then you will get the new tab of SP Tool which you ask the location of the scatter file on your PC. Now select the "MT6592_Android_scatter.txt"  file.


Step 4: Now connect your switch off phone with PC via USB cable (Make sure your phone is switched off).


Step 5: SP Tool detect your phone and process will start. If Sptool is not recognize/detect your phone then install USB  Driver for Octane Plus driver.


Step 6: Now start installing recovery in your phone by flashing.


Note: - Don't interrupt this process as it can potentially brick your device. Make sure no power interruption takes place.

Step 7:  After the process complete, a green ring will appear.

Here have successfully installed CWM Recovery  in your Karbonn Titanium Octane Plus.


Now let's start to Root your Titanium Octane Plus:

Step 8: Disconnect your phone.


Step 9: Do not start your phone. Press and hold vol. up + power button then select “recovery mode” (If your touch not work then use volume up and down key for menu up and down and Power button as a enter button)

Step 10. Click on install button/ choose install and select UPDATE.zip file from your save location on your SD card and install this file. Now  reboot your phone.


Enjoy Rooted phone.

Note: I am not responsible if you make Mistakes and Bricked Devices.

Click Here to Join Karbonn Octane Plus Facebook Group.


Read more »

Friday, June 7, 2013

Root Micromax Canvas HD A116 4.2.1

Downloads & Requirements :
1. Install ADB Drivers Download link: Android ADB Drivers
2. Download Motochopper root tool

Procedure:
1. Make sure you have installed the ADB drivers because without it, it will not work at all.
2. Extract the Motochopper root tool to a place you can access easily.
3. On your A116/A919i Duo go to About Phone > tap Build Number several times > Go to developer            options > Enable USB Debugging.
4. Now connect your phone in USB Debugging mode.
5. Now open the Motochopper root tool folder and run the run.bat file.


Just follow the steps and you will Root Micromax A116 Canvas With Android 4.2 in no time.

So that was all. A simple way to Root Micromax A116 Canvas With Android 4.2 Jelly Bean.

If you have any doubt then you can get them cleared in the comments section below.
Read more »

How to update Micromax Canvas HD A116 to the official stock Android v4.2.1 V1 ROM


Complete guide on how to update Micromax Canvas HD A116 to the official stock Android v4.2.1 ROM released by Micromax.

Requirements:
1.  Official stock ROM JB 4.2.1 :download link Canvas HD Stock ROM 4.2.1
2.  Canvas HD Drivers : Canvas HD Drivers
3. SP Flash Tool v3.1304.0.119 download link: SP_Flash_Tool_v3.1304.0.119
4. A Windows PC
5. A Micromax Canvas HD A116 (obviously)
 Installation tutorial : Micromax Canvas HD Stock ROM 4.2.1 Tutorial (youtube) by Gogi Rana

Steps:-

1. Install drivers for your phone using Mobistel_Cynus_T1_Drivers_x86
2. Extract the Stock ROM folder

Optional

{

If you want to install CWM along with official rom,then replace recovery.img with cwm recovery (Download CWM updated Version)

Note:Use recovery.img(Default) if you want tech support from micromax Service center other wise they will freeze you warranty.

}

3. Extract and open the SP Flash Tools.(Run As Administrator)

4. In SP Flash Tools, click on Scatter-Loading and the program will ask you the location of the scatter loading file for your device.

 5. In the extracted folder of the stock rom, go to the folder named “S9201_4.2_MP_F3F8_B1_IN_MMX_09__flasher_user” and select the file“MT6589_Android_scatter_emmc” which is our scatter loading file.


6. Switch off your phone (Remove the battery+ sim card+ memory card to make sure it is switched off).IMP*** Do not put your battery again,the phone should be without battery,sim card and memory card while flashing process completes.

7. In Flash Tool, go to Options and Click USB Mode so that it is enabled. Click options again and then go to DA Download All > Speed and finally select High Speed. *IMP


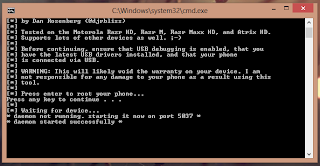
 8. Click the Firmware Upgrade option on the left of Download option and the flash tool will start searching for your phone.

9. ***Connect your phone now. The Flash Tool will start the flashing process, the progress of which can be viewed from a yellow progress bar at the bottom of the flash tool.

**Don’t interrupt this process as it can potentially brick your device.
**Make sure no power interruption takes place. (Use a laptop to ensure this).

 10. After the process completes, a green ring will appear on your device idicating that the process was successful.

 11. Disconnect your phone.

12. Reinsert Battery+sim card+memorycard and switch on your phone

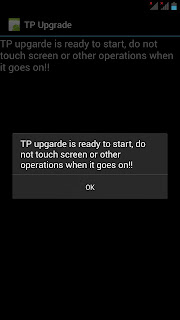
13. [NOTE] After Flashing and updating from 4.1.2 to 4.2.1 there will be a TP UPDATE pop up which will update the TP upgrade automatically. So it is advised DON'T TOUCH PHONE's SCREEN ON FIRST BOOT (don't even press the OK button), LET THE TP UPGRADE DO HIS WORK, WAIT FOR AT LEAST 10-15 MINUTES BEFORE DOING ANYTHING.

This is how TP upgrade looks like when it gets triggered...remember don't touch the screen  (don't even press the OK button)

Look at  the next screenshot how TP upgrade does his work automatically without hitting the OK button.

When TP upgrade firmware is flashed succesfully...Now hit ok and u can now N'joy JB 4.2.1 on your Canvas HD.
Read more »